Friday, January 27, 2012

Finally! Done...but not happy....

Well, it's done and I still kick myself for not using coutil....learn from me, spend the time and money and buy coutil....you won't get the nasty little stretch ripple that even the heavy twill I used can produce.  I trimmed it with a sweet cotton insertion lace.  I also found vintage, probably 1930s, pink garter clips.  Of course since nothing is easy they are coming from England.  The shipping was more than it cost me to buy them from Etsy, but then again the whole thing was about the cost of a Starbucks grande latte....you just have to love the internet...makes the whole world one big sewing notion store.


Here are photos of the finished ripply corset...which just will have to do:


Sunday, January 22, 2012

Still Working on the Damn Corset...yah I said "damn".....


For those of you who sew projects like this you know that sometimes bad words just slip out.....I'm just not happy about this, and am still staring at this wondering what the heck to do...no time to make another...I have the dress to make and another huge project that I'm obligated to....so no way is there time....or is there?

Here is a photo of mine and from the fabulously talented seamstress from bridgesonthebody:
 

Her beautiful corset....so perfect.


Earlier the same day (01/22/12)

Well, I'm almost done with my corset and am not too happy with it.  I skimped and hurried and didn't order coutil and am paying for it bc the twill I used just has too much give...serves me right.  The other issue is that I seem to be squishier than I expected to be, and I can get the corset all the way closed without quite getting the look I had hoped for.  Also the stays in front are too long.  I realized too late that I can't sit with the long stays, so they need to be cut down.  Of course I read this at bridgesonthebody blogspot after I had already purchased the longer front stays.

I used two layers of pink twill and a layer of white printed cotton fabric.  The white fabric is a bit sheer and the pink gives a pink glow through the white fabric.  I will have to find garter clips that I like -- sadly the wide vintage looking one are no where to be found (except in black).

I ordered my busk and stays from corsetmaking.com, I've put their link in my favorite, they were awesome, particularly since I think I made them crazy changing my order mid way and then getting my package coast to coast in two days.

Now one link I want to recommend is bridgesonthebody.blogspot.  This amazingly talented seamstress was the motivation for my sewing this corset.  She also organized a sew-along, but I didn't join, having started the project before she started her sew-along.  It is an amazing learning resource.  The pattern I used was hers.

I'm not going to have time to redo this corset, and will have to be happy with it as is.  It does give a nice line but not as tiny a I had hoped, its more the regular me, but like I'm wearing snug jeans.


This was the original pattern.  It was an 8.5 x 11 page.  I enlarged the pattern onto paper then onto muslin.


I left a wide margin to get a fit.


I took the muslin and then transferred it to paper again and was cutting the layers of twill. Should have bought coutil...

The magic  box of goodies from the corset supply house.

Good tools are always essential, this is my Home Depot awl, perfect for installing part of the busk.

This press was a wonderful investment, I could not imagine setting all the 00 grommets by hand with a hammer and tap.


You can see the bumps caused by the stretching.

I will fix the lumpy bits by stitching the fabric flat.


Sunday, December 25, 2011

Titanic Gown -- And Away We Go...

So I wimped out and took the bodice pieces to the blueprint shop and had them scaled up, took just a few minutes for them to do it and saved me HOURS of drafting time.   So I had actual paper pattern pieces then drafted the skirt pieces by myself.  I've discovered that the heavy roll of painters paper makes fantastic pattern paper!  I can't really do much until the corset is done but I can get a general jist of how things are going to go.  Thankfully it appears that the dress will be close to my own dress size--something that seems a bit odd since dresses of the period are usually so much smaller.


I've included a picture of the wedding dress I'm picking apart so  you can see the lace, in a way it already has the silhouette of a period gown.  One shot is a close of up of the netting.  I think I found a the fabric for the underskirt...it is a light green silk taffeta that is shot with a pinkish orange...but I'm still looking.  Part of the colour choice is the price at the discount fabric store.  More photos to follow.

Sunday, December 4, 2011

Corsets Corsets Corsets...


12/04/11
I think I found "the dress" to reproduce (different from my original idea of using a Laughing Moon pattern) , of course it will be different than the picture below, and will be a few years out of fashion for 1912 (the dress will be a 1910 model) but I will need the right undergarments.  A fellow guild member has kindly offered to draft up her pattern in my size and I'm going to give it a go.  I'm so excited.  The corset will have to be done before I really start the dress but I can work on the dress mock up in the mean time.  Here is the dress I want to make, the design will be completely different since I will be using the wedding dress lace but this is the shape:


This dress is from Jane Arnold's book Patterns of Fashion -2.  Not sure what colour I will use, but the lace is a soft white.

Here are examples of the correct long line corset to be worn under this style.  Very different from the Victorian or S-curve of the early Edwardian period:


You can see that some styles have garters to hold up stockings.  Now just for eye candy, I found this dress:

Saturday, November 26, 2011

100th Anniversary of the Titanic -- A Grand Affair

The costumer's guild I belong to will be having a gala in honour of the 100th anniversary of the sailing (and sinking) of the Titanic.

The Last Dinner on the Titanic
Saturday, April 14th, 2012

Save the Date! The Last Dinner on the Titanic – 100th Anniversary. The event of the century is coming your way! Join us for an amazing dinner, as we replicate the dishes served for the first-class (and last) meal on board the beautiful ship. Dancing & card games to end your sparkling evening. Suggested costume: 1st Class Passengers, Teens Era, 1910-1915.


Very excited about this. And now to sew. I scored an amazing beaded wedding dress on Craigslist. I will post pictures soon. The net is heavily beaded and will be used for a teens years gown (1911-1914). I plan to use Laughing Moon pattern #104. However, I need a long-line corset and unless I find a vintage girdle I will be sewing one...ugh.

Here is the pattern and an example of what you can make from it:


Here are some beautiful real gowns (1911 - 1914):


Thursday, May 5, 2011

Marathon Costuming -- 64 Days to Build an 18th Century Gown

And the story ended....
Finally finished if you count tacking things at the same time you are trying to get out the door. The even was glorious, the people amazingly draped, the setting just lovely--kind of felt like I was on a movie set.

Lots of things to go back and fix at a later date, but all in all I was pleased. Here are some photos:


(I didn't notice the crooked trim...ugh...thats what I get for tacking things on as I'm trying to get to the ball....)


Ok...I have no idea how far I am not but wherever I am it is not far enough.

Updates are:
Scored awesome shoes on ebay. Silk dupioni with a very good look to them, not of course totally period correct but the gist is there.

Also scored great glass pearl choker with a rhinestone detail in front, but no matter how I tried to photograph it -- it didn't work.

Basic dressed is 70% put together. I LOVE working with silk taffeta. I looked to see what retail would cost me and I was even more thankful to my friend who brought this back from Thailand. Now one of the biggest challenges was the fact that the fabric is only 40" wide. I had to change the cutting lines on the side panels. Thankfully I'm short and smaller so there was just enough with some left for trim. I am only using a panel for the under petticoat, since only a portion will show.

I also had to shorten the waist since I'm so short waisted. I had to make a draped mock up of the pattern piece then pin and sew all the crazy darts. I used that draped piece as a pattern and got a surprizingly good fit.

I am wondering if they will have AC...I really don't want to sweat in this thing.

Here is a pic of the pinned version:


and here are pics of the under part that the dress is built on (the blue, the green are undergarments), I was able to get a pretty good fit:


Day 1

Somewhere along the way I lost the momentum I had after the stays and underpinnings were completed. I've known for almost a year that in July the Costumer's Guild would be having an 18th Century salon.

I have no doubt that I will be sewing the night before for sure! I'm also seriously tight on money right now but remembered that I had 10 yards of silk taffeta that was brought from Thailand for me. It is this beautiful dark blue, like a deep deep blue sapphire. It has a wonderful texture, crisp and ten yards of fabric weigh almost nothing! I love silk. I've had it for the last 9 years tucked safely away for the perfect dress.

The pattern is one from JP Ryan: http://www.jpryan.com/ladiespatterns.html


Pattern is ordered and should show in a few days, I need blue cotton to flatline parts of the dress and that will be had at my favorite fabric store, Fabrics R Us for about $2/3 a yard.

I have no idea what I'll trim it with since I'm broke, but I'll figure it out.

Here are some dresses I really like and will use as inspiration. My fabric isn't patterned so I hope to do some really snazzy trim, but this is all a first attempt (which better be damn good bc I'm not going to be able to replace the material...lol).



Wednesday, March 2, 2011

Fixing the Stays -- Might as Well Do This Right

Well, thinking I would just get away with my first attempt at the stays with the too long arm straps I was just about to sew them together when I decided to do it right.  I undid the binding and cut down the straps and then redid the binding...argh!  In the end it worked well enough and now it is done right.  You can see the pics in the initial stays entry and the pics below.


Above are the after, below is the before:

Wednesday, February 16, 2011

18th Century Clothing: Pocket Hoops or Panniers, and undergarments -- Mardi Gras Costume

02/28/11
I've now got most of this complete.  I used a Simplicity pattern for the chemise, although I completely redid the sleeve because I didn't want this gathered poofy thing going on.  The petticoat was draped without a pattern.  I took a look at several blogs and "how to get dressed in the 18th century" blogs and figured I could do without a pattern, and it worked out fabulously.

I will admit that everything is built out of five yards of cotton that was used as a Thanksgiving tablecloth.  I figured eventually I'd use it to flatline something or make undergarments.  I managed to work around a stain left by the gravy boat being knocked over by an inebriated guest, and since I'm short there was plenty of yardage to work with.  The fabric had been washed,  spot treated so it no  longer smelled like turkey, and dried to get it to shrink a bit.

The following pic is a quick dry run.  An update on the stays:  I was able to make the stays smaller by overlapping the back and lacking it shut like that -- not correct but without doing that the stays were too big and didn't really cinch me in.  The shoulder straps are also way way too long, but for now I'm going to sew them together--I think rather than redo the whole darn thing....maybe....we'll see.   I have a great mask to wear which I will photograph later.


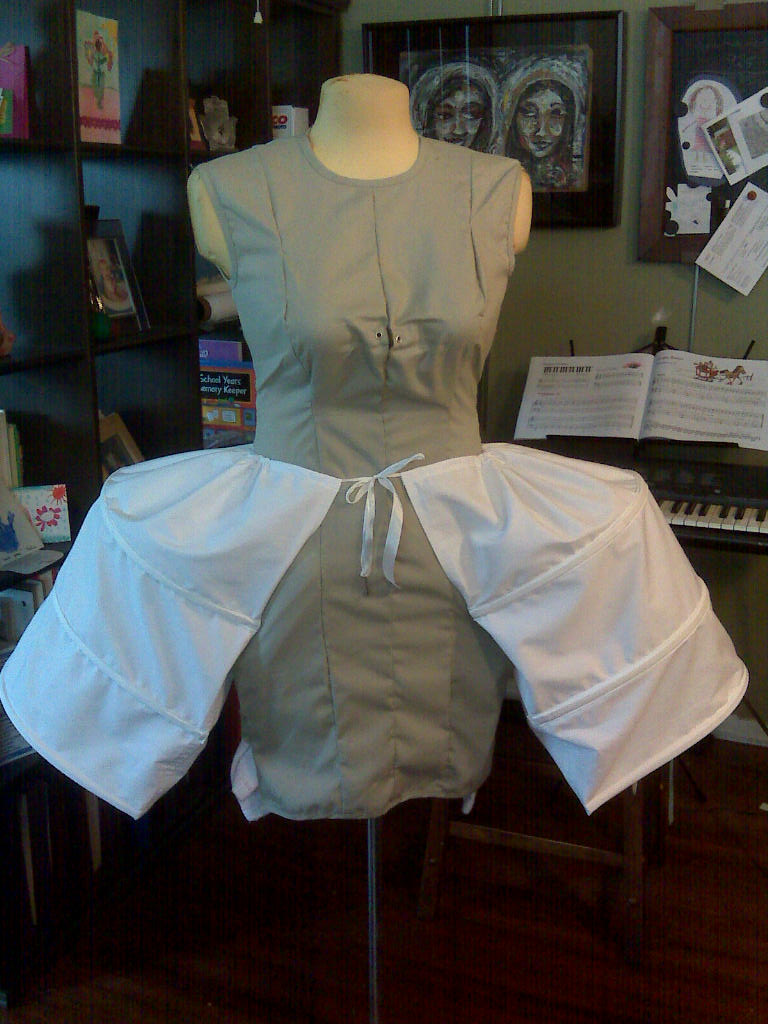
02/21/11  Pocket hoops are done, but not without a great deal of modification.  I used the pattern provided in the link below, however, there were no instructions regarding scaling.  As a person who is on the line of petite/average I found the pattern to be too long.  So in the end I cut off 8" of the width of the two pieces, and more than 6" on the length.

I've been told that the first time you wear panniers they seem unnatural and that bigger/wider is better, however, for my frame the original pattern sized seemed unreasonably large.  This will do for now.

I used the industrial zip ties again, this time finding a better deal in the plumbing department (25/36" heavy ties for $10).  These seemed to be a bit heavier than the ones in the electrical department and I doubled them up in each casing (used 12 total).  I think I'm ok with the finished product, and since I'm going for historical feel rather than accuracy they will do.


First Post:  I will be going to a Mardi Gras costumed/masked party soon and want to wear a historical costume rather than anything scary or too revealing.  I don't have time to sew a dress but I have the stays and can whip up a petticoat and chemise.  However, I need the pocket hoops.  I found a DIY site that I will try to replicate the hoops.  I will not use steel for this one but rather the industrial zip ties, but probably two in each channel.  Here is the link:

http://www.ferdalump.com/panniers.html