
Tuesday, October 8, 2013
The Aunt Inez Dress Unveiling!!
Sunday, September 15, 2013
The Aunt Inez Dress Project: Lining and Beading (or how I'm slowly losing my eyesight)

LINING: My first attempt at lining failed. I had purchased some lovely and cheap silk chiffon off of ebay. The restoration concept was to line the dress completely and rebead through both layers to stabilize the dress and transfer the weight of the beading off of the fragile outer silk. Good in theory no so good in practice. 1) The black silk caused the "sheerness" of the dress to disappear because it made everything dark You could hardly see the beads. This was resolved by using a light umber chiffon which unfortunately is not silk instead. I did not have time to mail order more fabric and take a leap of faith that it would be right when I got it. The second pic below shows the dress with the lighter goldish fabric below it. 2) I thought I could just rebead a little bit and that would be good enough. Nope....much more extensive beading is required. So I'm using my trusty #20 needle (love it!) and silk thread and slowly losing my eyesight. Not having good ergonomics is also a problem so I can only bead in short intervals before my body is exhausted. I need a much taller table and now have a lot more empathy for third world beaders.

Umber fabric linking in photo below

BEADING BASICS: As I mentioned a good needle and silk thread seem to be key. However the thread used to bead the dress is thick, almost like embroidery floss. Where I have to add missing beads I have to double my thread and then go back across the beading at least twice to get it to look like the original beaded areas. The glass beads are amazing. The seed beads are six sized and reflect light beautifully, you might think them round until you hold one and look closely. The faceting of the tiny beads really gives the dress sparkle. The larger flat backed beads are like rose cut diamonds. They are faceted like a round diamond but then poke up like a pyramid in the center.
Where to get extra beads?
The hem!! I got this juicy tidbit from a blog called "Nan Sews the Dress," an amazing restoration of another amazing 1920s gown. I also am getting beads because I am somewhat reworking the beading pattern to balance out the dress as I repair it. Since in the end I will not have enough beading to restore the dress perfectly, I'm doing what I need to do to get a lovely outcome. Here is the hem stash:


Here are stitching pictures:


REALLY IMPORTANT BITS:
1) Pin the area you are working on together and smooth flat. You may get some poof from the original fabric being grossly out of shape but if you don't pin you will end up with big poofs you will need to undo (trust me...learned the hard way).
2) Make sure you keep all the little bits of thread and fuzzy off the sandwiched part of your materials. Learn from me that having to work a teeny tiny bit of black thread out of an area you have stitched shut is a huge time waster.

FIXING MISSING PATTERNS -- EVERYTHING YOU NEED IS PROBABLY IN YOUR KITCHEN AND JUNK DRAWER!:
I'm probably not the first person to come to the following conclusion but I found that by using the following I was able to easily replicate missing beading patterns --
clear zip top sandwich bags
white paper (napkin)
scotch tape
black sharpie marker
I'll go over how then you can follow the pics below: Lay a sandwich bag over the area you want to trace. I find working in small areas is better, all you need is another sandwich bag when you move on (and you could technically reuse the bags for lunch). Use your sharpie to trace the over the good beading area (even if it is on another part of the dress). Now that you have your pattern you can use your sharpie and copy the pattern on the other side of the bag from the first side (just lay it down flipped over and trace what you have already done). Figure out which side you will use for your pattern, then on the opposite side tape a white piece of paper, napkin tissue etc. This will help in visibility. Then slip the whole thing under the lining and original dress. Use pins to secure it and then carefully recreate your pattern without sewing into the plastic. I found that the needle just kind of slipped over the plastic as long as I wasn't using brute force. Not once did I sew into the bag. Here are photos:


Saturday, September 7, 2013
The Aunt Inez Dress Project: MORE PATCHING!
September 7th - today I am moving to lining and beading the dress but before I share that portion I have more photos of all the patching. I had thought I had caught every hole and tear I was going to patch but then when I set the lining I saw more...ugh. The big project change change was that I decided to pull off the grosgrain ribbon at the shoulders on both the front and back. I'm still not sure how I will make the top look nice but I'll figure it out as I go. Here are more pics:
 (Above) I did the burn test on the grosgrain and it appears to be silk ribbon. I decided to remove it on all four shoulder points to reduce the bulk when I possibly covered the shoulders to hide the ugly bits. That meant that on all four shoulder points I had to remove and stabilize with the new black silk.
 (Above) There were lots of good beads to scavenge and I made sure to get every little seed bead.
 (Above) Apparently at one time the dress had a side shoulder opening as well as the side bodice opening. The front had torn away and had at some point become stitched into the back of the dress (below). I saved the vintage snaps, they are kind of cool.

 (Above) I had removed some of the beading to be able to get a good repair in. I will re-bead the area.
Oh, and although not 1920's I wanted to share another wonderful pair of shoes from American Duchess -- I'm a bit of a fan! Check out her new "Claremont" Oxfords....oooooh....I know I want a pair:
<a id="rc-6a65891" class="rafl" href="http://www.rafflecopter.com/rafl/display/6a65891/" rel="nofollow">a Rafflecopter giveaway</a><script src="//d12vno17mo87cx.cloudfront.net/embed/rafl/cptr.js"></script>
http://americanduchess.blogspot.com/
Saturday, August 31, 2013
The Aunt Inez Dress Project: PATCHING! Tiny Stitches...lots and lots of tiny stitches.
I was on an epic quest to find a way to glue small bits of new black silk to patch holes and tears before I underlined the dress. Lets just say my epic quest turned into an epic failure. I requested technical assistance from the wonderful members of the Greater Bay Area Costumer's Guild, and as always they came to my rescue. Well, kind of rescue...in that the answer to my question "what fabric glue will try matte and clear," was none will. I had already gone through several test runs and everything dried shiny and clear, white, or shiny white. Ug. Oddly Fray Check did not dry shiny or white but provided only a temporary hold...booo!
Here is a test run of some small spots of iron on tape, as well as glues...might be hard to tell but none really worked:

Before I started patching the dress I decided to stabilize the ripped areas and holes. Through testing on a piece of the original sleeve I found that if I used a fine paint brush and dipped it into Fray Check and painted the edges of the tear or hole I could stop the edges from fraying. I was still working on the large pieces of paper I had set out earlier on the island top. The Fray Check dried very fast and I would poof the fabric up a bit so it wouldn't stick too badly to the paper. I didn't have one area adhere so tightly to the paper that there was residue. REMEMBER, I did a precheck with the old fabric first before I dove in.

So back to patching: The answer to my question was stitching will be the only way to go. I pulled out a #20 needle I could barely thread, picked up a small spool of silk thread at the local big box fabric store and set off to patch Aunty's dress. Immediately I ran into issues. The smaller bits of silk I cut to patch the small holes frayed as I tried to sew them on. Frustration ran high...I had to pause and find chocolate.
Thinking a bit I used the concept of fiberglass repair to make my own stabilized patches. I did a test run with a (aprox) 5 x 10 inch piece of new silk first and found that it worked beautifully!!! Here is what you need: Fray Check, tin foil, paint brush. I found using blue painters tape helped with hanging the piece to dry.


AND NOW FOR THE FUN STUFF: Patching and stitching, stitching and patching....


HERE ARE MORE PHOTOS OF PATCH WORK:


The shoulders present a huge challenge. I was going to leave the grosgrain ribbon that was at one time added (along with tape) to stabilize the shoulders...then I decided not to. Repairing the shoulder made me realize that with large patches it is apparent that the two silk materials are quite different, the old has a more subtle finish and the new a tighter weave. I will still cover the shoulders further to camouflage the repairs but for now I've done this:


Thursday, August 22, 2013
The Aunt Inez Dress Project: Interesting Bits and Challenges
LET THERE BE LIGHT:

I realized quickly that I was going to need more light on this project and the two overhead high wattage lights over the island were not going to work. Nothing like a little female ingenuity...this is a clip on, bendable reading lamp we had in the house from Ikea. Clipped it on to the portable Ipod speaker unit and viola! Light!
As I inspected the dress further I was really confused as to why there were old snaps in the seams on both shoulders. The sleeves were partially sewn on and partially snapped on. I thought maybe this was to provided Aunt Inez with options, sleeved or sleeveless...but I just don't get the shoulder snaps:


Another challenge will be the smallest machine stitches I've ever seen on the side seams. The seams are French seams and I hope to take them apart...carefully...using my new Ikea light/Ipod contraption:

I previously posted a picture of the inner back label someone stuck on. I think in the end it was some sort of medical tape. It came off and left a gooey mess:


Finally I wanted to share the lovely hand stitching that was holding the hem up. Nothing is wrong with it other than the original (I'm assuming) black thread has faded to a brown-black colour. I find vintage and antique hand stitching somewhat sentimental. Someone ever so carefully stitched this hem and I'm picturing her in my head; the maid? the seamstress? the lady of the house? the mother for her daughter? Hands most likely long passed on...sigh...

Thursday, August 15, 2013
The Aunt Inez Dress Project: Looking at what is wrong...
What is wrong with this dress? A whole lot! Looks great laying on the island but when you start looking it has some real serious issues. The most amazing thing about this was at one point someone used ELECTRICAL tape to keep it together, here is the before and after. The tape was on the inside of the dress. I didn't remove it until I had soaked the dress:


There was also a laundry tag that said "Holdt" or "Held" it was very stiff fabric tape and left icky residue on the dress when it was removed:

There are lots of weak spots or bare spots where the sheer silk is just gone. On some spots black iron on tape was used to keep it together:

 Thankfully after soaking the dress these weird stiff fabric bits came off without doing too much more damage.
The shoulders had disintegrated and grosgrain ribbon was used to stabilize it, it is awful! The stitching is so sloppy that I wonder if the dress was used for Halloween or some teenagers school play:


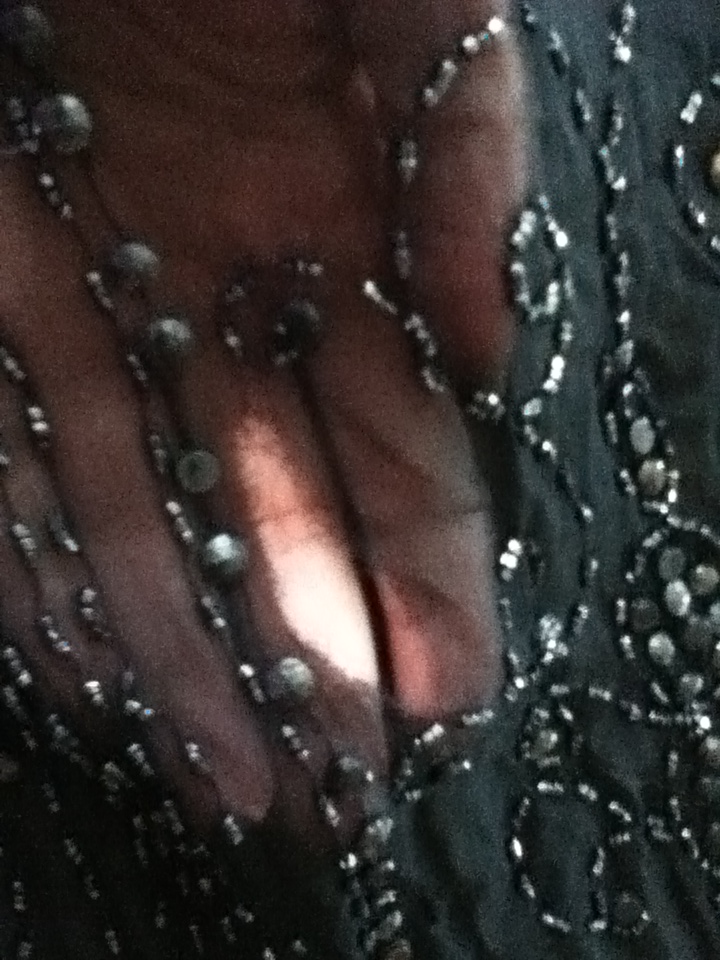
Here are a number of weak or bare spots, the best one was the one with no fabric behind intact beading...where did the fabric go?


 The pic above where my nail is shows the beading that is still intact but there is no fabric behind it! Huh?
The least of my issues was that the dress had a musty smell and when I soaked it -- twice in a tiny bit of oxy powder and cold water it turned the bathtub water iky brown but then seemed clean and smelled fresh:

 The wet dress dried quickly once I put the fan on. I could in no way hang this dress and was afraid to drape it over anything -- but this worked perfectly with no apparent shrinkage.


There was also a laundry tag that said "Holdt" or "Held" it was very stiff fabric tape and left icky residue on the dress when it was removed:

There are lots of weak spots or bare spots where the sheer silk is just gone. On some spots black iron on tape was used to keep it together:


The shoulders had disintegrated and grosgrain ribbon was used to stabilize it, it is awful! The stitching is so sloppy that I wonder if the dress was used for Halloween or some teenagers school play:


Here are a number of weak or bare spots, the best one was the one with no fabric behind intact beading...where did the fabric go?


The least of my issues was that the dress had a musty smell and when I soaked it -- twice in a tiny bit of oxy powder and cold water it turned the bathtub water iky brown but then seemed clean and smelled fresh:


Subscribe to:
Posts (Atom)