Saturday, August 31, 2013

The Aunt Inez Dress Project: PATCHING! Tiny Stitches...lots and lots of tiny stitches.


I was on an epic quest to find a way to glue small bits of new black silk to patch holes and tears before I underlined the dress.  Lets just say my epic quest turned into an epic failure.  I requested technical assistance from the wonderful members of the Greater Bay Area Costumer's Guild, and as always they came to my rescue.  Well, kind of rescue...in that the answer to my question "what fabric glue will try matte and clear," was none will.  I had already gone through several test runs and everything dried shiny and clear, white, or shiny white.  Ug.  Oddly Fray Check did not dry shiny or white but provided only a temporary hold...booo!

Here is a test run of some small spots of iron on tape, as well as glues...might be hard to tell but none really worked:

Before I started patching the dress I decided to stabilize the ripped areas and holes.  Through testing on a piece of the original sleeve I found that if I used a fine paint brush and dipped it into Fray Check and painted the edges of the tear or hole I could stop the edges from fraying.  I was still working on the large pieces of paper I had set out earlier on the island top.  The Fray Check dried very fast and I would poof the fabric up a bit so it wouldn't stick too badly to the paper.  I didn't have one area adhere so tightly to the paper that there was residue.  REMEMBER, I did a precheck with the old fabric first before I dove in.


So back to patching:  The answer to my question was stitching will be the only way to go.  I pulled out a #20 needle I could barely thread, picked up a small spool of silk thread at the local big box fabric store and set off to patch Aunty's dress.  Immediately I ran into issues.  The smaller bits of silk I cut to patch the small holes frayed as I tried to sew them on.  Frustration ran high...I had to pause and find chocolate.

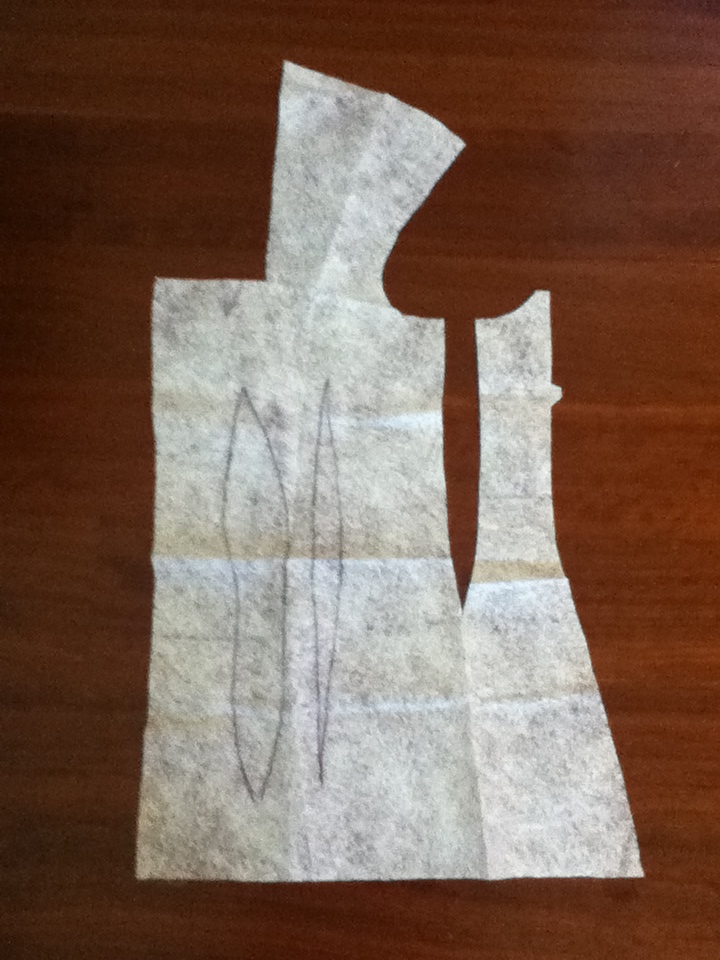
Thinking a bit I used the concept of fiberglass repair to make my own stabilized patches.  I did a test run with a  (aprox) 5 x 10 inch piece of new silk first and found that it worked beautifully!!!  Here is what you need:  Fray Check, tin foil, paint brush.  I found using blue painters tape helped with hanging the piece to dry.

 A note here is that I found that when I coated the fabric by dropping Fray Check from the bottle I did end up with more shiny areas than when I just squeezed the liquid into the cap and painted it on.  I made sure that all the fabric was coated but I did not saturate the material.
Here is where the blue tape came in handy.  Oh, forgot to mention.  I found that if I ironed my new fabric first it was easier to coat.

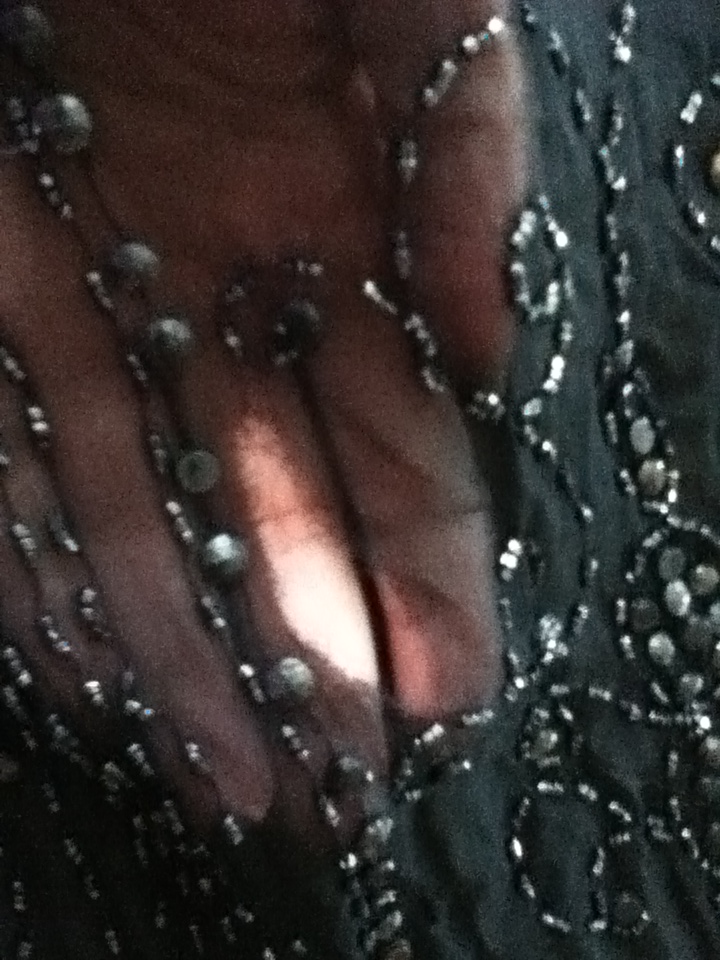
AND NOW FOR THE FUN STUFF:  Patching and stitching, stitching and patching....

 Above is the large dried patch and a small piece I cut out.  I find if I cut a larger patch than I need then CAREFULLY trim away excess after I sew it in I get decent results.  I also don't knot the thread.  I leave about a 3 inch tail and when I reach my starting point after stitching around the perimeter then I tie off the two ends.
 Above I show using pins but for the smaller patches I don't pin, I found it did more damage than help.

HERE ARE MORE PHOTOS OF PATCH WORK:


Above is before and after.  I am not patching every single weak spot on the dess, but will patch any holes that can't be covered by beads, and anything hugely apparent.  Here are more:


The shoulders present a huge challenge.  I was going to leave the grosgrain ribbon that was at one time added (along with tape) to stabilize the shoulders...then I decided not to.  Repairing the shoulder made me realize that with large patches it is apparent that the two silk materials are quite different, the old has a more subtle finish and the new a tighter weave.  I will still cover the shoulders further to camouflage the repairs but for now I've done this:

 First I removed and saved the loose beading (above)
 Then I cleaned up the opening a little bit (above).

 I coated another larger piece of material since the smaller one was used up making patches.

 Above is the patch, however, I went on to take off the grosgrain ribbon and will post a pic of that soon.

Thursday, August 22, 2013

The Aunt Inez Dress Project: Interesting Bits and Challenges


LET THERE BE LIGHT:


 I realized quickly that I was going to need more light on this project and the two overhead high wattage lights over the island were not going to work.  Nothing like a little female ingenuity...this is a clip on, bendable reading lamp we had in the house from Ikea.  Clipped it on to the portable Ipod speaker unit and viola! Light! 

As I inspected the dress further I was really confused as to why there were old snaps in the seams on both shoulders.  The sleeves were partially sewn on and partially snapped on.  I thought maybe this was to provided Aunt Inez with options, sleeved or sleeveless...but I just don't get the shoulder snaps:

You can see (above) the mangled mess the shoulder seams are.  It is going to be seriously challenging to fix.

Another  challenge will be the smallest machine stitches I've ever seen on the side seams.  The seams are French seams and I hope to take them apart...carefully...using my new Ikea light/Ipod contraption:


I previously posted a picture of the inner back label someone stuck on.  I think in the end it was some sort of medical tape.  It came off and left a gooey mess:

Figuring I couldn't do a whole lot more damage to this dress (ok, I theoretically could but since this is not a restoration project I was willing to take the risk) I used baby oil to remove the residue...and you won't believe this IT WORKED!  My theory was it takes gum out of children's hair so why not gummy ookiness off a nearly hundred year old dress...
Not perfect but workable!  I was hesitant to try any rubbing the q-tip I used any harder because the silk is so fragile.  I also then rinsed the area with cool water and blotted dry.  Seems not to have harmed the fabric.

Finally I wanted to share the lovely hand stitching that was holding the hem up.   Nothing is wrong with it other than the original (I'm assuming) black thread has faded to a brown-black colour.  I find vintage and antique hand stitching somewhat sentimental.  Someone ever so carefully stitched this hem and I'm picturing her in my head; the maid?  the seamstress? the lady of the house?  the mother for her daughter?  Hands most likely long passed on...sigh...


Thursday, August 15, 2013

The Aunt Inez Dress Project: Looking at what is wrong...

What is wrong with this dress?  A whole lot!  Looks great laying on the island but when you start looking it has some real serious issues.  The most amazing thing about this was at one point someone used ELECTRICAL tape to keep it together, here is the before and after.  The tape was on the inside of the dress.  I didn't remove it until I had soaked the dress:


There was also a laundry tag that said "Holdt" or "Held" it was very stiff fabric tape and left icky residue on the dress when it was removed:


There are lots of weak spots or bare spots where the sheer silk is just gone.  On some spots black iron on tape was used to keep it together:


Thankfully after soaking the dress these weird stiff fabric bits came off without doing too much more damage.

The shoulders had disintegrated and grosgrain ribbon was used to stabilize it,  it is awful! The stitching is so sloppy that I wonder if the dress was used for Halloween or some teenagers school play:


Here are a number of weak or bare spots, the best one was the one with no fabric behind intact beading...where did the fabric go?


The pic above where my nail is shows the beading that is still intact but there is no fabric behind it!  Huh?


The least of my issues was that the dress had a musty smell and when I soaked it -- twice in a tiny bit of oxy powder and cold water it turned the bathtub water iky brown but then seemed clean and smelled fresh:

The wet dress dried quickly once I put the fan on.  I could in no way hang this dress and was afraid to drape it over anything -- but this worked perfectly with no apparent shrinkage.


Wednesday, August 14, 2013

"Aunt Inez's Dress; Circa 1925" - Reinventing a 1920s Evening Gown aka THE AUNT INEZ DRESS PROJECT


"Aunt Inez's Dress;  Circa 1925" was written in fountain pen on the label holding the tissue paper shut when I received this dress.  One of those rare Ebay finds where I was able to buy the dress for pennies on the dollar compared to what similar quality dresses were going for.  Not sure if this had to do with it being black or the moon was full.  Either way I didn't care -- I needed a dress for THE PARTY.  In October my friends are being married and having a seriously swanky reception themed on the movie "Midnight in Paris."

The invitation reads:  "A theme celebration in honor of the newlyweds inspired by the movie "Midnight in Paris," that will take you back to the glorious age of Paris in the 1920s.  Please dress in French inspired couture from your "Golden Era."

I now begin the AUNT INEZ DRESS PROJECT...I also scored a great pair of shoes that will be awesome once I will dye the suede a soft black.  The shoes are great but I need them black to go with the dress.  Another under cheap find on Ebay!  Sometimes shopping karma is good...sometimes not, and sometimes it is awesome!!

Here are the shoes, and I will blog details about about the dress soon:

Here is Aunty's dress on the Ebay add:


Tuesday, August 6, 2013

The Tissot Picnic Dress -- Construction


I have been pretty tardy at getting the details about this dress up.  As I am about to embark on a new adventure (reworking a pretty fragile 1920s dress) I thought I would try to get as much up as I could now so I can focus on the next project. I also have bonnet instructions although this bonnet was much too large for the period and I will cut it down to be in better scale in the future.


I started by highly modifying a Truly Victorian polonaise pattern for the top and then draping the skirt out of white cotton poly I had in the stash.  The dress was made from two curtain panels I bought for $6 at Goodwill, Ikea clearance center lace curtains, two panels were about $14, and some ebay buttons $6 (nice pierced metal) and some $4 a yard organza (super wide) that I bought from the local thrifty fabric mart.  In theory this whole dress is machine washable....in theory...

I started by putting my newly completed corset on my mannequin, I was happy with the corset (see prev post) but it could have been smaller.  I can get the center almost closed and the top bust spreads a little more than I would have liked...oh well...it is the learning process.  The big thing is that it fits comfortably and I can wear it for long periods of time!

Here are the inspiration pics.  I liked the pointy part of the bodice on one and the lace/rushing application on the other.  The dress is really a hybrid of lots of fashion plates I looked at as well the limitations the fabric had in terms of amount...this would have looked a bit different if I had had a few more curtain panels.


And this dress which inspired the choice of sleeves:


 There was lots of pinning and unpinning to work the curves and to get the point I wanted.  I like to use coloured sharpies to mark my mock ups -- but BEWARE, if you have a nice corset underneath do not do this.  I have a heavy body double cover I made to go over the corset and I lightly make notes and that keeps the corset underneath "safe."


One of the best things I learned from the GBACG Victorian bodice class was to let go of the notion that darts had to be so pretty and symmetrical.   I had to separate the side-back from the side-front on the pattern to get the shape I need, above is before I did that.

Here I have draped the front of skirt and started to drape the top part of the poof.

Here is the final drape of the skirt with the lower portion tacked on.  All this was done over the petticoat I previously mentioned.  I then used the skirt drape as a pattern for the curtain panels.  Since the curtain panels were already lined I did not use the skirt mock up as a lining.


Here are the photos for the skirt before it was decorated.  Some people will trim the front panel before sewing the whole thing together -- I realized that would be handy after the fact.  Next time I will probably do it that way.  (Excuse the weird yellow lighting, the dress is the light icy blue.) The bottom pic shows how I hemed the dress to have the balayeuse peaking out and the whole under petticoat and balayeuse worked great in regards to keeping the dress quite clean after being dragged around a working farm.

The trim was a lesson in patience.  Even with the ruffler that I purchased, which made ruffling easier but made so much noise, came out of alignment easily and broke most of the sewing needles I had in my stash...it too a long time and yards and yards of material to get the look.   I cut endless strips and serged them together and just sewed for what seemed like forever.  Lots of thread was used and my family was happy for the quiet moments in-between.


 To get the shape of the poof I  made pleats on the two side seams of the poof as well as run a tape town the middle which I then tacked the swags of the poof to.  I played around with different pinned configurations until I found a look that I liked.

Above you can see the based/pinned top which was an overlay of lace over the solid fabric.  Sadly I seem to have lost most of the bodice construction photos.  If I find them I will add them to this post in the future.  Here is the skirt almost done.  Below is the finished skirt.


If I do this again I will be more careful to make sure the ruching, it is a small detail but in my opinion an important one, is perpendicular to the floor.  The last wide row got a little wanky and sideways on me.  Might not bother you but makes me CRAZY!

Now initially I wore the skirt as it is above, however, I realized the silhouette was a little off for what I envisioned.  The second time I wore the dress I added ties (similar to that on the petticoat) to the dress and pulled in a little to get this:


I liked the narrow look much better.  Enjoy and sorry about the bodice construction photos -- if I ever figure out what happened I'll post them :-)