Sunday, April 14, 2013

Self - Education in Corset Making or "I think I always do things the hard way."

I want to look like the above corset, I have a good "squishability" factor, a rather ample bosom to ribcage ratio and apparently based on my attempts to do this "learning" project more junk in my trunk than I thought I did.  I know that you also have to allow the squish to go somewhere, it either has to go up or down.  I don't know much about corset making.  Years ago I had a spectacular corset made at Dark Garden, http://www.darkgarden.com. I've never owned a piece of clothing that has potentially gone up in value, when I had my corset custom made it was decidedly cheaper and the waist size was a 22".  Now they are more expensive and my lady bits have grown in girth.

I began by purchasing a really REALLY cheap Chinese corset.  For the cost of the busk I got the whole thing sent to my home, shipping included.  Got to love Ebay.  I bought a huge size thinking I could just adjust the curves down leaving the bust and hips.  That was a fiasco.  Obviously I need to take a pattern drafting class.  All was not lost because I decided to add gussets.  Who knows if this will work in the end but I don't want to start sewing all my upcoming costumes on my old corset which doesn't do what I want it to do.  I may try this then in the end by a corset pattern anyway, we'll see.

Here is the bought corset,you can see it is basically a large macaroni tube on me:


I started by marking the basic natural waist and where the under bust was while wearing a bra, I marked on the outside and transferred to the inside with water soluble sewing marker :


I then put my DG corset on manikin and padded the hips to a more correct size for the everyday me and not the tightly corseted me.  I deconstructed part of the corset and started pinning away...well that was just a big duhhh....when I tried it on.  I started undoing seams at the bust and hips.  Note to self:  when using sharp tiny scissors always remember to take off your shirt or you *might* cut holes in it...learn from me people...really...


You can see that the corset is starting to take some shape.  Again, people...remove clothing before you start cutting seams...unless you are not partial to your garments -- fraycheck was my friend that day.

I started doing some fittings without a top, and decided my girls were a bit out of control.  I need to take a class, there is magical physics behind this somewhere.  I'm sure there is an algorithm that holds the secret of extreme corset curvature.  Note that this is all done without the boning at this point except at the back.  The corset came with cheapie boning (as can be expected for a corset at a silly low pricepoint).  I will add spiral boning eventually.  I made gussets from two layers of cotton and one of very thin silk -- but it was what I have in the house.  I am trying to make the best use of my stash.

I took the time to base the edges and gussets to not have too much slippage.  Basted and watched Dr Who...I believe in using my time efficiently :-)

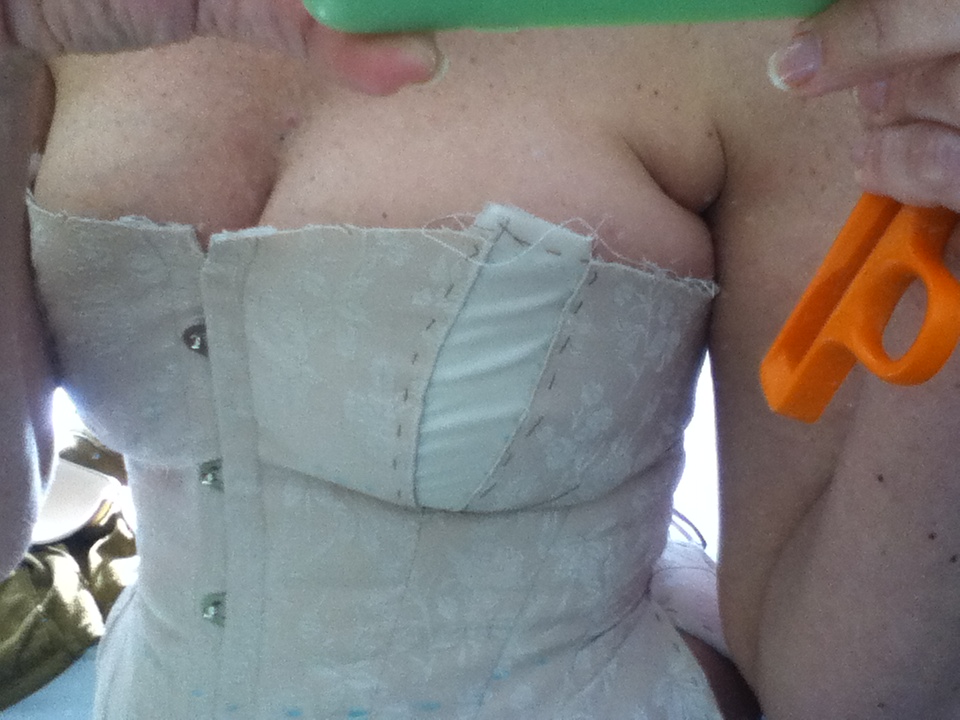
I started with the bust gussets but there was too much width from armpit to armpit so the girls were more widespread and relaxed than I wanted them to be:


 I then tightened up the seam on the sides, here you can see the pinning:

I am holding up the side (above) to mimic the boning that would eventually go in.  Unfortunately, I was off on my sewing, and apparently am not all that symmetrical, I flattened one of the ladies and had to go back and let some of the seam out:


Now it is break-time I'm tired of looking at this.  I've put it on and taken it off today at least 157 times...ok, maybe not that many but it sure feels like it!! lol! 

Tuesday, April 9, 2013

The Quick 'n Dirty $4 1880s Duct Tape Hat


I haven't posted in a while because I got bogged down with life which impeded my sewing, then I stagnated...my fault entirely.  I'm trying to get motivated.  So many projects and so little time -- or in another way, tickets to the ball in hand and no dress...sigh.

Months ago I worked on the Book Cover Dress and literally at the last minute crafted a hat.  I called that project my "quick 'n dirty" project because it is pure theater, very little craftsmanship and lots of hot glue.  Now since I do costumes and do not reproduce clothing, I was happy with the outcome which at least on the outside was fab.  Here is the breakdown of the cost:

$3.99  Thrift store fedora, new with the tag still on it.
$1.50  Small bit of discount fabric store fabric
$0       Feathers from the stash.
$0       Ribbon from the stash
$0       Duct tape, hot glue/gun, and all the bits to put it together (already in hand).

Total:  aprox. $5.50 - not bad when starting with a four dollar thrift store hat.


THE GOAL:


Tall and fabulous!


THE PROCESS:
First I began by using a sharpie and marking the hat, estimating where I wanted the slope and giving me a line to cut out the front portion because the angle was not good for a Victorian-ish reproduction.

Here you can see the slope I decided on.


I then added strips of duct tape both horizontally and perpendicularly to shape the slope that I wanted.  I don't have a picture of the next steps in which I took a round piece of cardboard and hot glued it on the top to give me a flat hard surface to work with and to make sure I didn't have sag on the hat top.  I then had a long rectangular piece of fabric which I eased and pleated around the brim.  This was folded to cover the lower brim and tucked into the inside top of hat.  On the outside I snipped tabs to lay flat on the side of the hat body.  once that was pinned, glued, and tacked with a needle and thread I covered the round top with fabric which had tabs hanging over the edge.  Finally I used a rectangular piece of fabric with the edges folded over and ran it around the had body.  I sewed the top edge with a needle and thread but hot glued the lower and back seam.  Then I played for a while trimming the hat out with stuff I already had and using pictures of 1880s hats as guides.


Although not perfect it worked with the outfit.  I'm not thrilled that the peacock feathers decided to lean opposite the other feathers.  I probably will fix that before the next time I wear the hat.  One day when I have time (hear hysterical laughter in the background) I may make a real hat.


I had been horribly ill right before this event, and apparently it showed, I really do have lips..lol.  I am not normally this pale although for some costuming I wish I was.  Enjoy the Duct Tape Hat...