I found the fabric a semi sheer cotton poly blend for $2 a yard. It is hard to go wrong at that price. I over bought thinking I was going to cartridge pleat a spectacularly full skirt then decided that was terribly silly, for no other reason that I didn't want a particularly full skirt.
I posted to the guild yahoo group a question regarding hoop circumference and a lively discussion ensued. I am pleased with my old ebay bought hoop, although after several years of owning it I finally decided to trim the bottom net. The impromptu surgery was successful. Additionally, for some unknown reason this project has been slow and tedious and has resulted in very injured fingertips. I am not sure how I was able to keep my repeatedly injured fingers off the fabric but I was constantly bleeding from a needle or pin jab -- ewww!
I was thankful for a discussion with another costumer in regards to draping a petticoat that was fitted rather than pleated or gathered, I believe that this cut down a great deal on the bulk of the skirt at the waist.
I also raided another blog, Reconstructing History (fabulous!) for a formula on how to decide how much yardage for cartridge pleating. I wasn't looking to do that kind of pleating but did need some sort of mathematical formula, which in the end I worked backwards from because I knew how many yards, I just needed the spacing between pleated gathers. Here is the QUOTED INFORMATION from the site. All credit goes to the owners of the site/blog:
**********************************************************
The Formula
How do you know how much fabric you need for a cartridge pleated garment? The magical formula follows. A little experimentation on your part is necessary.
- Decide on your pleat depth. Make up a small sample of your chosen fabric, pleating 6 to 12 inches. Draw up the gathering threads tightly and count the number of pleats in one inch of pleated fabric. Remember this number.
- Multiply your pleat depth by 2. This is how much fabric is needed for one pleat.
- Multiply this number by the number of pleats per inch.
- Multiply this number by the measurement of whichever body part the garment is going to go around (waist, neck, etc.).
- Divide this number by 36. You will now have the number of yards of fabric necessary to create a perfectly fitted, pleated garment.
An example: I want to make a ruff with a pleat depth of 2 inches and my neck measurement is 13 inches. With cotton muslin, there are 5 pleats to the inch.
2 X 2 = 4 X 5 = 20 X 13 = 260 ÷ 36 = 7.22 or 7 1/4 yards of fabric.
************************************************************
Now what I did to try to get a number to get an even spacing was to work backwards. All that math I poo-pooed in school really has come in handy! I started with the end number of 4 yards of fabric (since I did not want an overly poofy skirt). I then worked the mathematical formula to work out the number of pleats per inch for my end waist measurement. In the end the n = 4 allowed me to figure the spacing. Have a I lost you now? Just don't think about it too much and go to the photos...
Here are some photos and I will return to add explanations:
 |
| TV447 - I highly recommend their patterns! |
 |
| I used some dummy credit card that came in the mail to make an easy measure on where to put my dots (water soluble marker). Having a simple shim to measure the spacing out saved a significant amount of time. |
 |
| Although this is a cartridge pleating technique, I was really going for far fewer folds per linear inch. I did thread two needles and spaced the top gather from the bottom gather aprox 1/2". |
 | |||
I used pins to keep the pleats in place once I had them where I wanted them.
|


 |
| The hardest thing was to get the first horizontal pleat in. Once that was done I used the credit card template to space the rest. I stopped to sew each one after it was pinned rather than sew them all at one time. This way I was sure I was getting a nice spacing and didn't over-sew and not leave a hem allowance. |
 | |
I used the left over piece of dummy credit card to make a spacer for my horizontal skirt pleats.
I didn't really didn't put a lot of effort into measuring the length carefully but rather used the fabric selvages top and bottom and figured I'd muddle through as many pleats as I had space for and still be able to get a hem. I didn't do an authentic hem which would have been much deeper but it worked for me and I was able to get five horizontal pleats.
. |
 |
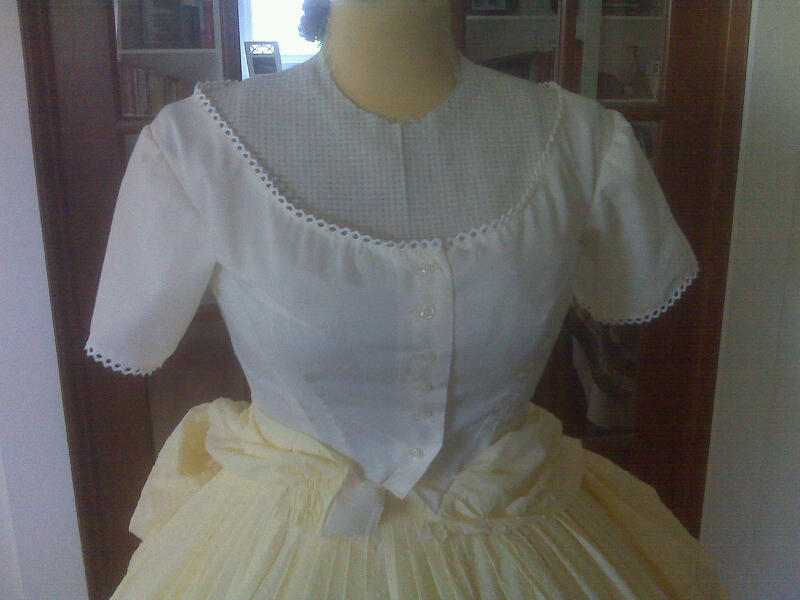
| Here is the underbodice. Two issues I have with most patterns is the fact that I'm short-waisted and that with the corset my bust to waist ration usually requires the finagling of extra darts, gussets, seams or other measures to get a fit in the bust. Here I had to add the extra seam, no other messing with the existing darts and seams was going to make this work. I also decided not to pipe the shoulder opening but I did take up the easy with needle and thread then use a very thin bias tape to finish the edge. Again more hand sewing that I really wanted to do but I don't want to machine finish the edge. |

 | |
| Although not historically correct, I added a white cotton crochet-like trim to the inside neckline of the inner bodice. I hand stitched the whole darn thing on because I didn't want a machine stitch to show. Only when I was half way done did I think to myself that nobody would see the machine stitching because this was going to be on the inside! Duh!! Sigh. Sometimes I over think and other times I don't think at all. Note to self: when sewing late at night take an extra minute or two not to be so dull witted. |
*********************
Next I am working on the bishop sleeves. I'm just so unmotivated with this project. It really is an easy pattern but I'm moving so slowly because it just isn't my usual time period of interest. In the spirit of making things harder I am adding horizontal pleats to the sleeves. Unlike the skirt I am not "winging" it this time. I sketched out (to scale) a number of different widths and settled on a 3/8 pleat with a 1/2 spacing. I'm also only doing three pleats at the upper arm. Again to make it harder I'm first going to sew the sleeve then sew the pleats so that the pleats do not stop at a seam. Details details details....
Here is the plan, lets see how it works: 1) make up a piece of paper with the correct measurement to add the necessary length to the sleeve. 2) slash the pattern and add paper. 3) mark sleeve prior to sewing 4) sew sleeve with french seams 5) sew horizontal pleats 6) sew cuff. Simple right?
08/09 -- well the answer to that is WRONG! Evil yellow sleeves...lol! Actually it wasn't so bad except that I had to rip out all the hand sewing on one cuff because I was again sewing without paying attention. Now the part of the above steps that I did change was #4 and #5. I decided it would be easier to sew the pleats but not all the way THEN do the french seams. Below is the photo of the sleeve before I put it together as a tube. This really was an easy way to do this, and unlike the skirt I first pinned everything then sewed it all, rather than working one pleat at a time. The discolouration in the photo is from where I sprayed water to get rid of the blue water soluble ink:

Once I joined the long seem (in a french seam to make it clean) I then went back to the machine and stitched the remaining few inches of pleats. Super easy. I do recommend having a good sewing "ham" and other tailor tools to get a nice pressing:

I will post the sleeves eventually but now the question is whether I run pleats across the front of the top of the dress. Here is an example:

I'm just not sure what to do because if I run the pleats then it may look too busy by competing with the pretty scooped lining which I edged with cotton crochet like lace. I think I'll have to mull this one over...
08/15 This project should have been done by now but it isn't. I've gotten very excited about several other projects but this one...bla...
That said the answer to the bodice question is "no pleats." I decided not to mess with the pretty neckline of the under bodice. I finished the sleeves using the machine this time to attach the pretty crochet like lace to the undersleeve. Took no time at all unlike the bodice where I hand stitched everything. Now to get the button holes in and attach buttons. I found tiny pretty plastic buttons for the underbodice and shell buttons (white with a tinge of yellow) for the outerbodice -- sometimes having a button stash can be a good thing.
 |
| Only regret is that I did not lengthen the sleeve more and add two more pleats. |
Well, I'm done except for a couple hooks and eyes.....totally uninspired....lol...but its done before the picnic which is good.....now I will have to try this on and figure out how to hide my beautiful corset from showing through all the sheer material.
 |
| This is NOT how the pattern was intended to be. The sleeves were supposed to be worked together, however with the fiddling I had to do to get the bust to fit I changed the neckline in such a way that the shoulder seems no longer matched. Not ideal since now the underbodice shoulder seem is not lined up and you can see this through the sheer sleeve material. Lesson learned for next time (if there is a next time). |


No comments:
Post a Comment